Installation
VyOS installation requires a downloaded VyOS .iso file. That file is a live install image that lets you boot a live VyOS. From the live system, you can proceed to a permanent installation on a hard drive or any other type of storage.
Release Type |
Description |
Release Cycle |
Intended Use |
Access to Images |
Access to Source |
|---|---|---|---|---|---|
Nightly (Current) |
Automatically built from the current branch. Always up to date with cutting edge development but guaranteed to contain bugs. |
Every night |
Developing VyOS, testing new features, experimenting. |
Everyone |
Everyone |
Stream |
VyOS Stream serves as a technology preview and a quality gate for the upcoming LTS release. Allows everyone to try new features and check if they work well or need improvements |
Every quarter |
Non-critical production environments, preparing for the LTS release. |
Everyone |
Everyone |
Release Candidate |
Rather stable. All development focuses on testing and hunting down remaining bugs following the feature freeze. |
Irregularly until EPA comes out |
Labs, small offices and non-critical production systems backed by a high-availability setup. |
Everyone |
Everyone |
Early Production Access |
Highly stable with no known bugs. Needs to be tested repeatedly under different conditions before it can become the final release. |
Irregularly until LTS comes out |
Non-critical production environments, preparing for the LTS release. |
Everyone |
Everyone |
Long-Term Support |
Guaranteed to be stable and carefully maintained for several years after the release. No features are introduced but security updates are released in a timely manner. |
Every major version |
Large-scale enterprise networks, internet service providers, critical production environments that call for minimum downtime. |
Subscribers, contributors, non-profits, emergency services, academic institutions |
Everyone |
Hardware requirements
The minimum system requirements are 4 GB RAM and 10 GB storage. Depending on your use, you might need additional RAM and CPU resources e.g. when having multiple BGP full tables in your system.
Download
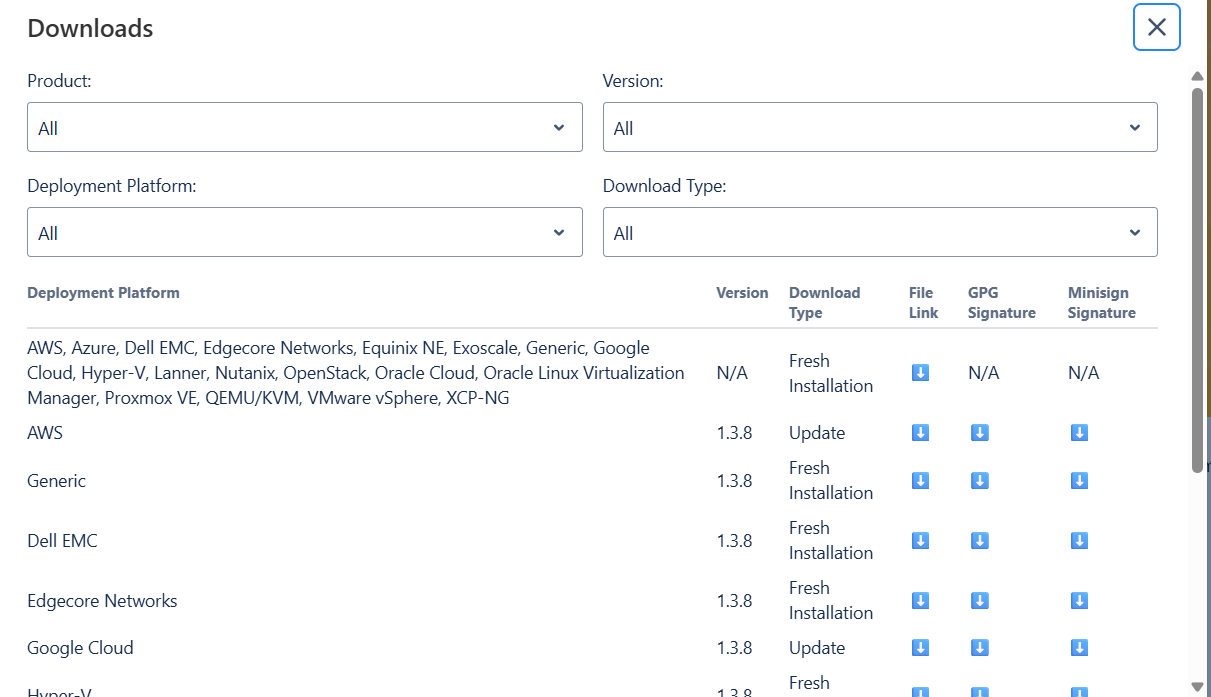
Registered Subscribers
Registered subscribers can log into https://support.vyos.io/ to access a variety of different downloads via the “Downloads” link. These downloads include LTS (Long-Term Support), the associated hot-fix releases, early public access releases, pre-built VM images, as well as device specific installation ISOs. See this article for more information on downloads.
Rolling Release
Everyone can download bleeding-edge VyOS rolling images from: https://downloads.vyos.io/
Note
Rolling releases contain all the latest enhancements and fixes. This means that there will be new bugs of course. If you think you hit a bug please follow the guide at Bug Report/Issue. We depend on your feedback to improve VyOS!
The following link contains the list of the most recent VyOS builds for AMD64 systems from the current branch: https://vyos.net/get/nightly-builds/
Download Verification
LTS images are signed by the VyOS lead package-maintainer private key. With the official public key, the authenticity of the package can be verified. Minisign is used for verification.
Minisign verification
Currently we are using Minisign for release signing which is a simple tool to sign files and verify signatures.
In 2015, OpenBSD introduced signify. An alternative implementation of the same protocol is minisign, which is also available for Windows and macOS, and in most GNU/Linux distros it’s in the repositories now. It is portable, lightweight, and uses the highly secure Ed25519 public-key signature system.
T2108 switched the validation system to prefer minisign over GPG keys.
To verify a VyOS image starting off with VyOS 1.3.0-rc6 you can run:
$ minisign -V -P RWTR1ty93Oyontk6caB9WqmiQC4fgeyd/ejgRxCRGd2MQej7nqebHneP -m vyos-1.3.0-rc6-amd64.iso vyos-1.3.0-rc6-amd64.iso.minisig
Signature and comment signature verified
Trusted comment: timestamp:1629997936   file:vyos-1.3.0-rc6-amd64.iso
During an image upgrade VyOS performs the following command:
$ minisign -V -p /usr/share/vyos/keys/vyos-release.minisign.pub -m vyos-1.3.0-rc6-amd64.iso vyos-1.3.0-rc6-amd64.iso.minisig
Signature and comment signature verified
Trusted comment: timestamp:1629997936   file:vyos-1.3.0-rc6-amd64.iso
Note
Starting with 1.4.3, VyOS uses Minisign exclusively. This should not be a problem for anyone because Minisign signature verification has already been present in all releases for years. But if you see an unexpected verification error, you can solve that by updating your system to 1.4.2 first. Removed support for GnuPG signatures(T7301).
Live installation
Note
A permanent VyOS installation always requires to go first through a live installation.
VyOS, as other GNU+Linux distributions, can be tested without installing it in your hard drive. With your downloaded VyOS .iso file you can create a bootable USB drive that will let you boot into a fully functional VyOS system. Once you have tested it, you can either decide to begin a Permanent installation in your hard drive or power your system off, remove the USB drive, and leave everything as it was.
If you have a GNU+Linux system, you can create your VyOS bootable USB
stick with with the dd command:
Open your terminal emulator.
Find out the device name of your USB drive (you can use the
lsblkcommand)Unmount the USB drive. Replace X in the example below with the letter of your device and keep the asterisk (wildcard) to unmount all partitions.
$ umount /dev/sdX*
Write the image (your VyOS .iso file) to the USB drive. Note that here you want to use the device name (e.g. /dev/sdb), not the partition name (e.g. /dev/sdb1).
Warning: This will destroy all data on the USB drive!
# dd if=/path/to/vyos.iso of=/dev/sdX bs=8M; sync
Wait until you get the outcome (bytes copied). Be patient, in some computers it might take more than one minute.
Once
ddhas finished, pull the USB drive out and plug it into the powered-off computer where you want to install (or test) VyOS.Power the computer on, making sure it boots from the USB drive (you might need to select booting device or change booting settings).
Once VyOS is completely loaded, enter the default credentials (login: vyos, password: vyos).
If you find difficulties with this method, prefer to use a GUI program, or have a different operating system, there are other programs you can use to create a bootable USB drive, like balenaEtcher (for GNU/Linux, macOS and Windows), Rufus (for Windows) and many others. You can follow their instructions to create a bootable USB drive from an .iso file.
Hint
The default username and password for the live system is vyos.
Permanent installation
Note
Before a permanent installation, VyOS requires a Live installation.
Unlike general purpose Linux distributions, VyOS uses “image installation” that mimics the user experience of traditional hardware routers and allows keeping multiple VyOS versions installed simultaneously. This makes it possible to switch to a previous version if something breaks or miss-behaves after an image upgrade.
Every version is contained in its own squashfs image that is mounted in a union filesystem together with a directory for mutable data such as configurations, keys, or custom scripts.
Note
Older versions (prior to VyOS 1.1) used to support non-image
installation (install system command). Support for this has been removed
from VyOS 1.2 and newer releases. Older releases can still be upgraded via
the general add system image <image_path> upgrade command (consult
Image Management for further information).
In order to proceed with a permanent installation:
Log into the VyOS live system (use the default credentials: vyos, vyos)
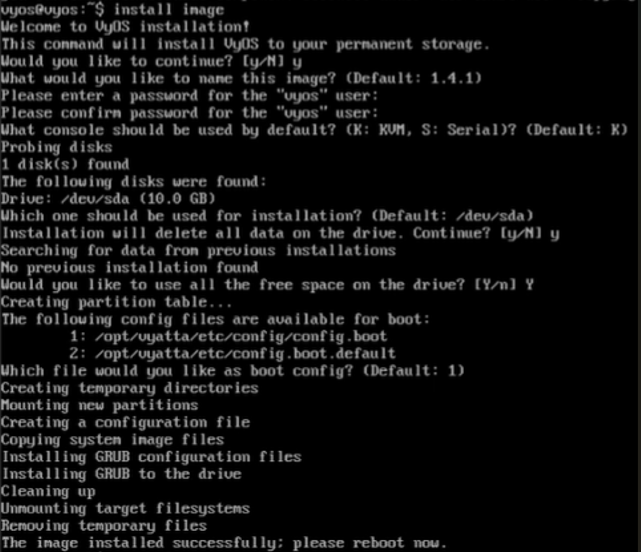
Run the
install imagecommand and follow the wizard:
PXE Boot
VyOS can also be installed through PXE. This is a more complex installation method that allows deploying VyOS through the network.
Requirements
Clients (where VyOS is to be installed) with a PXE-enabled NIC
Webserver (HTTP) - optional, but we will use it to speed up installation
VyOS ISO image to be installed (do not use images prior to VyOS 1.2.3)
Files pxelinux.0 and ldlinux.c32 from the Syslinux distribution
Configuration
Step 1: DHCP
Configure a DHCP server to provide the client with:
An IP address
The TFTP server address (DHCP option 66). Sometimes referred as boot server
The bootfile name (DHCP option 67), which is pxelinux.0
In this example we configured an existent VyOS as the DHCP server:
vyos@vyos# show service dhcp-server
 shared-network-name mydhcp {
     subnet 192.168.1.0/24 {
         bootfile-name pxelinux.0
         bootfile-server 192.168.1.50
         default-router 192.168.1.50
         range 0 {
             start 192.168.1.70
             stop 192.168.1.100
         }
     }
 }
Step 2: TFTP
Configure a TFTP server so that it serves the following:
The pxelinux.0 file from the Syslinux distribution
The ldlinux.c32 file from the Syslinux distribution
The kernel of the VyOS software you want to deploy. That is the vmlinuz file inside the /live directory of the extracted contents from the ISO file.
The initial ramdisk of the VyOS ISO you want to deploy. That is the initrd.img file inside the /live directory of the extracted contents from the ISO file. Do not use an empty (0 bytes) initrd.img file you might find, the correct file may have a longer name.
A directory named pxelinux.cfg which must contain the configuration file. We will use the configuration file shown below, which we named default.
In the example we configured our existent VyOS as the TFTP server too:
vyos@vyos# show service tftp-server
 directory /config/tftpboot
 listen-address 192.168.1.50
Example of the contents of the TFTP server:
vyos@vyos# ls -hal /config/tftpboot/
total 29M
drwxr-sr-x 3 tftp tftp      4.0K Oct 14 00:23 .
drwxrwsr-x 9 root vyattacfg 4.0K Oct 18 00:05 ..
-r--r--r-- 1 root vyattacfg  25M Oct 13 23:24 initrd.img-4.19.54-amd64-vyos
-rwxr-xr-x 1 root vyattacfg 120K Oct 13 23:44 ldlinux.c32
-rw-r--r-- 1 root vyattacfg  46K Oct 13 23:24 pxelinux.0
drwxr-xr-x 2 root vyattacfg 4.0K Oct 14 01:10 pxelinux.cfg
-r--r--r-- 1 root vyattacfg 3.7M Oct 13 23:24 vmlinuz

vyos@vyos# ls -hal /config/tftpboot/pxelinux.cfg
total 12K
drwxr-xr-x 2 root vyattacfg 4.0K Oct 14 01:10 .
drwxr-sr-x 3 tftp tftp      4.0K Oct 14 00:23 ..
-rw-r--r-- 1 root root       191 Oct 14 01:10 default
Example of simple (no menu) configuration file:
vyos@vyos# cat /config/tftpboot/pxelinux.cfg/default
DEFAULT VyOS123

LABEL VyOS123
 KERNEL vmlinuz
 APPEND initrd=initrd.img-4.19.54-amd64-vyos boot=live nopersistence noautologin nonetworking fetch=http://address:8000/filesystem.squashfs
Step 3: HTTP
We also need to provide the filesystem.squashfs file. That is a heavy file and TFTP is slow, so you could send it through HTTP to speed up the transfer. That is how it is done in our example, you can find that in the configuration file above.
First run a web server - you can use a simple one like Python’s SimpleHTTPServer and start serving the filesystem.squashfs file. The file can be found inside the /live directory of the extracted contents of the ISO file.
Second, edit the configuration file of the Step 2: TFTP
so that it shows the correct URL at
fetch=http://<address_of_your_HTTP_server>/filesystem.squashfs.
Note
Do not change the name of the filesystem.squashfs file. If you are working with different versions, you can create different directories instead.
And third, restart the TFTP service. If you are using VyOS as your
TFTP Server, you can restart the service with
sudo service tftpd-hpa restart.
Note
Make sure the available directories and files in both TFTP and HTTP server have the right permissions to be accessed from the booting clients.
Client Boot
Finally, turn on your PXE-enabled client or clients. They will automatically get an IP address from the DHCP server and start booting into VyOS live from the files automatically taken from the TFTP and HTTP servers.
Once finished you will be able to proceed with the install image
command as in a regular VyOS installation.
Known Issues
This is a list of known issues that can arise during installation.
Black screen on install
GRUB attempts to redirect all output to a serial port for ease of installation on headless hosts. This appears to cause an hard lockup on some hardware that lacks a serial port, with the result being a black screen after selecting the Live system option from the installation image.
The workaround is to type e when the boot menu appears and edit the GRUB boot options. Specifically, remove the:
console=ttyS0,115200
option, and type CTRL-X to boot.
Installation can then continue as outlined above.